BERT
传统的word2vec
对于word2vec来说,一个词的词向量一旦训练好了之后就不变了(静态词向量),但是在实际生活中一个词可能有不同的含义,所以word2vec不适用于多语意。
Transformer
BERT是基于Transformer架构的模型,首先来看Transformer。(我的另一篇单独Transformer博客)
BERT
BERT全称:Bidirectional Encoder Representations from Transformers
BERT == Transformer的Encoder部分
由于"Learn from a large amount of text without annotation",BERT可以好好利用大量产生的无标注的数据,而Transformer需要有标注的数据。
向BERT中输入一个sequence,BERT输出sequence中word的Embedding。
如果进行没有标注的无监督训练,那BERT是如何训练的呢?
- Approach 1:Masked Language Model
Masked LM and the Masking Procedure:
Assuming the unlabeled sentence is my dog is hairy, and during the random masking procedure we chose the 4-th token (which corresponding to hairy), our masking procedure can be further illustrated by 1. 80% of the time: Replace the word with the [MASK] token, e.g., my dog is hairy --> my dog is [MASK] 2. 10% of the time: Replace the word with a random word, e.g., my dog is hairy --> My dog is apple 3. 10% of the time: Keep the word unchanged,e.g., my dog is hairy --> my dog is hairy. The purpose of this is to bias the representation towards the actual observed word.
The advantage of this procedure is that the Transformer encoder does not know which words it will be asked to predict or which have been replaced by random words, so it is forced to keep a distributional contextual representation of every input token.
- Approach 2:Next Sentence Prediction
In order to train a model that understands sentence relationships,we pre-train for a binarized next sentence prediction task that can be trivially generated from any monolingual corpus(从任意单一语言的语料库中生成). Specifically, when choosing the sentences A and B for each pretraining example, 50% of the time B is the actual next sentence that follows A (labeled asIsNext), and 50% of the time it is a random sentence from the corpus (labeled as NotNext).
Next Sentence Prediction: The next sentence prediction task can be illustrated in the following examples:
  Input =[CLS] the man went to [MASK] store [SEP]
  he bought a gallon [MASK] milk [SEP]
  Label = IsNext

  Input =[CLS] the man [MASK] to the store [SEP]
  penguin [MASK] are flight ##less birds [SEP]
  Label = NotNext
最终训练使用上述两种方式的结合。
- 利用上述方式pre-training之后,对不同的任务进行不同的fine-tuning
实际使用BERT模型
1 下载源码
从GitHub上下载源码地址,直接下载ZIP就好。下载好之后解压。
如果没有安装tensorflow 1.11.0(1版本的11及以上都可,但是2版本的不可)需要提前安装好tensorflow。
2 下载模型预训练文件
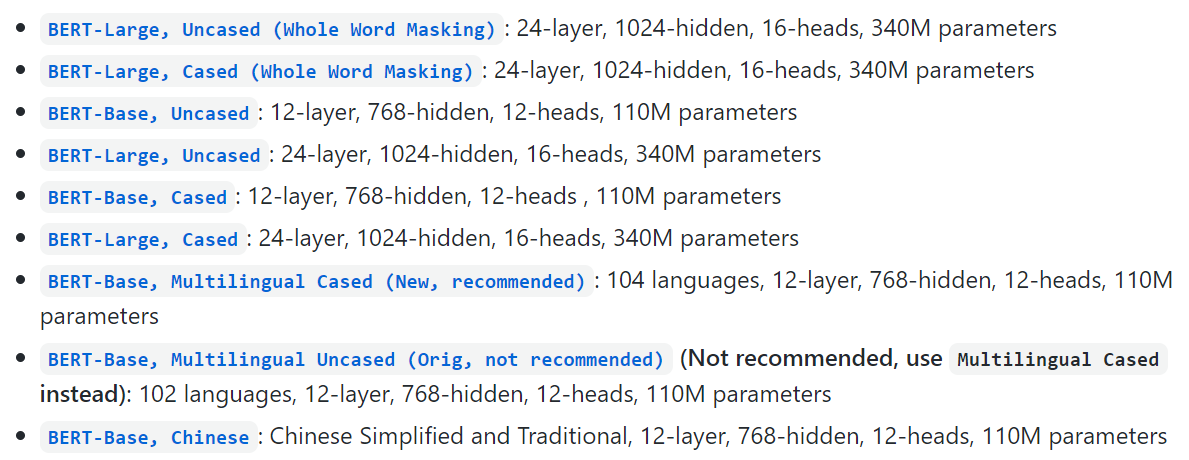
在Bert的GitHub(地址)的README.md中找到Pre-trained models部分,然后点击其中你想要下载的模型参数。 
下载好的文件中包含: * bert_model.ckpt,一共有3个,存储了模型预训练好的权重。 * vocab.txt,词(语)表。 * bert_config.json,存放Bert模型的超参数。
3 下载GLUE数据集(示例)
根据GLUE的GitHub上的步骤(地址)下载GLUE数据集,当然如果我们要用自己的数据训练模型时就提供自己的数据集,并对第1步下载好的代码做出部分的改动即可。
因为要以MRPC任务做示例,所以要下载好GLUE的data中包含MRPC任务的数据。
4 运行
以MRPC任务为例,运行BERT代码。MRPC(Microsoft Research Paraphrase Corpus)中的句子对(sentence pair)来源于对同一条新闻的评论,任务是判断这一对句子在语义上是否相同。
打开BERT源码,运行run_classifier.py。 > 运行时需要用命令行,确保python为tensorflow/bin/python,如果使用Anaconda Prompt需要进去tensorflow环境。
运行运行run_classifier.py的命令: 1
2python run_classifier.py --task_name=MRPC --do_train=true --do_eval=true --data_dir=/media/yons/sda2/bert/GLUE/glue_data/MRPC --vocab_file=/media/yons/sda2/bert/GLUE/BERT_BASE_DIR/uncased_L-12_H-768_A-12/vocab.txt --bert_config_file=/media/yons/sda2/bert/GLUE/BERT_BASE_DIR/uncased_L-12_H-768_A-12/bert_config.json --init_checkpoint=/media/yons/sda2/bert/GLUE/BERT_BASE_DIR/uncased_L-12_H-768_A-12/bert_model.ckpt --max_seq_length=128 --train_batch_size=32 --learning_rate=2e-5 --num_train_epochs=3.0 --output_dir=/media/yons/sda2/bert/GLUE/output/
--data_dir为自己的GLUE中MRPC数据的位置(全局路径),--vocab_file为第2步下载好的模型参数中的vocab.txt位置,--bert_config_file为第2步下载好的模型参数中的bert_config.json,--init_checkpoint为第2步下载好的模型参数中的bert_model.ckpt路径,--output_dir为输出的目录(这个目录需要自己提前建好,存储结果和参数。)
上面的命令中其余的参数可以自己调整。train_batch_size和num_train_epochs可以调小避免自己的计算资源不够。
5 run_classifier.py
BERT源码中的run_classifier.py含有对数据集的处理和读取的类,需要读取自己的数据集时需要参考着修改run_classifier.py。
- MRPC
本次利用MRPC任务,run_classifier.py中相应的类为: 1
2
3
4
5
6
7
8
9
10
11
12
13
14
15
16
17
18
19
20
21
22
23
24
25
26
27
28
29
30
31
32
33
34
35
36
37
38
39class MrpcProcessor(DataProcessor):
"""Processor for the MRPC data set (GLUE version)."""
def get_train_examples(self, data_dir):
"""See base class."""
return self._create_examples(
self._read_tsv(os.path.join(data_dir, "train.tsv")), "train")
def get_dev_examples(self, data_dir):
"""See base class."""
return self._create_examples(
self._read_tsv(os.path.join(data_dir, "dev.tsv")), "dev")
def get_test_examples(self, data_dir):
"""See base class."""
return self._create_examples(
self._read_tsv(os.path.join(data_dir, "test.tsv")), "test")
def get_labels(self):
"""See base class."""
return ["0", "1"]
def _create_examples(self, lines, set_type):
"""Creates examples for the training and dev sets."""
examples = []
for (i, line) in enumerate(lines):
if i == 0:
continue
guid = "%s-%s" % (set_type, i)
text_a = tokenization.convert_to_unicode(line[3])
text_b = tokenization.convert_to_unicode(line[4])
if set_type == "test":
label = "0"
else:
label = tokenization.convert_to_unicode(line[0])
examples.append(
InputExample(guid=guid, text_a=text_a, text_b=text_b, label=label))
return examples
- 自己的任务与数据
- 编写run_classifier.py中读取数据的类
复制一份run_classifier.py中已经有的DataProcessor类,然后在代码文件中修改类名,并根据自己的数据完善相应的函数。
class DataProcessor(objext)增加1
2
3
4
5
6
7
8
9
10
11
12
13
14
15
16
17
18
19
20
21
22
23
24
25
26
27
28
29class DataProcessor(object):
"""Base class for data converters for sequence classification data sets."""
def get_train_examples(self, data_dir):
"""Gets a collection of `InputExample`s for the train set."""
raise NotImplementedError()
def get_dev_examples(self, data_dir):
"""Gets a collection of `InputExample`s for the dev set."""
raise NotImplementedError()
def get_test_examples(self, data_dir):
"""Gets a collection of `InputExample`s for prediction."""
raise NotImplementedError()
def get_labels(self):
"""Gets the list of labels for this data set."""
raise NotImplementedError()
def _read_tsv(cls, input_file, quotechar=None):
"""Reads a tab separated value file."""
with tf.gfile.Open(input_file, "r") as f:
reader = csv.reader(f, delimiter="\t", quotechar=quotechar)
lines = []
for line in reader:
lines.append(line)
return linesclass MyTaskProcessor(object)完之后,在def main(\_)函数中相应地增加任务名。运行的时候1
2
3
4
5
6
7
8
9
10def main(_):
tf.logging.set_verbosity(tf.logging.INFO)
processors = {
"cola": ColaProcessor,
"mnli": MnliProcessor,
"mrpc": MrpcProcessor,
"xnli": XnliProcessor,
"Mytask": MyTaskProcesor,
}python命令的参数进行相应的修改即可。
